Thursday, January 17, 2013

Christmas Wrap-Up (ha!ha! see what I did there?)

To those of you actually reading this, you may remember that I decided to make most of my Christmas gifts this year. Well, not this year, but Christmas 2012 (I'm a little behind on my posting). I've already shown you some of what I did, so without further ado, here's the rest of homemade Christmas 2012...

Giant Floor Pillow (or Pillow Mattress)

This is the cutest, most comfortable thing EVER! It wasn't hard to make, just cumbersome. The pattern was found on Pinterest and bought from Quilter's Quarters . That's official Tangled fabric for the front and Tinkerbell fabric for the back. It's HUGE, but accordions up into a semi-reasonable size.  I think I like it better than my daughter does (I made it for her), but that's okay.


Necklaces

Many of the young ladies in my family received necklaces this year. These are cute and easy to make. I used the round and square Shape Studio Tools from Epiphany Crafts . I found images that I liked online, resized them to fit the die, and printed on glossy photo paper. Super easy. The bubble caps (the things over the images) and necklace settings are also from Epiphany Crafts.


I apologize for the quality of all the necklace photos.


Socks

These are loom knit socks using a very simple pattern I found online. I used a ribbed cuff instead of the rolled cuff shown on the YARNGEAR blog


The ones on the left are oversized for my mom (she doesn't like anything remotely tight) and the ones on the left are for my step-mom who is a University of Tennessee fan.


Embellished Kitchen Towels

These turned out nicely, and were easy to make using scrap fabric. The idea was inspired by several Pinterest finds such as Quilt Story , Sew 4 Home , and Be What We Love .


Scarves, Scarves, and More Scarves

Okay, so loom knitting scarves is easy and mindless and I might have gotten carried away. I don't even know if my family likes scarves. We live in the South where it's often 75 degrees on Christmas day, so do we even need scarves?

And these scarves really did turn out nicely. I'm just incapable of taking a flattering photo of a scarf. So when you look at these, imagine a more attractive version -- that's what they really looked like.

Unless otherwise noted, the scarves are all versions of the Keep Warm Tubular Scarf from Learn to Knit on Circle Looms .


I'm sooo disappointed in this photo. I LOVED this scarf. It's an infinity scarf. The colors were beautiful and it was soooo soft. Here it just looks like an ugly blob. This scarf is the Magic Mobius Scarf from Learn to Knit on Long Looms. I made another one of these out of beautiful hand dyed yarn in University of Alabama colors, but I think I forgot to take a photo before giving it away.
 
A loose weave, lightweight scarf. Very cute in real life.


Lightweight and slightly itchy, but still pretty in real life.


I made a fat version of this scarf and a skinny version. The yarn (?) was a little weird, but I liked it.


A close up of the scarf's texture.


Okay ... that's it. I'm done. Next year I'm either not making most of my gifts, or I'm giving gifts to fewer people. I didn't include the lotion I made or any of the canned goods. maybe if I feel up to it, I'll make a separate post about those...

Off to clean up my much neglected house!


Tuesday, December 4, 2012

No Time to Post

So it's been a while since I last posted. That's not because I'm being lazy ... it's because I decided to make 99% of my Christmas gifts this year. Still not sure why I thought that was a good idea since Christmas spirit comes and goes for me. Unfortunately, burn out is starting to settle in, but, on the plus side, I'm almost finished with everything I planned to make.

So if you're someone who is usually on my Christmas gift list, DON'T LOOK ANY FURTHER!!!! YOU MIGHT SEE YOUR GIFT!!!


You've been warned!

Here are some of the things I've made:

Pillows!!! 


You can never have enough pillows when you're laying around watching football (or whatever you like to watch on TV). Some of these pillows are variations on Rae Gun Ramblings' envelope pillow . Others are fleece sewn into a general pillow shape and stuffed with poly-fil. Some of the pillows have piping on them. This was a first for me and it went pretty well.


The Elf is helping me take pictures
 
This is my favorite pillow. I kind of want to keep it for myself.


Toys!!!

Some of the kids I buy for are getting pillows and others are getting toys (some are getting both). The monster was inspired by several Pinterest posts, but was ultimately my own creation. The owls are a combination of patterns ( Olly The Owl and So Tei-Tei: Stuffed Owl Tutorial ). The whale is from small dreamfactory . The dogs are from Miyako Kanamori's book Sock and Glove: Creating Charming Softy Friends from Cast-Off Socks and Gloves .

Yes, I know I should be using safety eyes instead of buttons, but it's hard to position the safety eyes before stuffing the toy.


Fleece hats!!!!

These are sooo cute and even easier to make. The hat pattern is courtesy of Fleece Fun . There are lots of cute patterns and hat variations. These are the most basic. The snowflake is cut from iron-on printable fabric.


I love the little top knots!


Sweater!!!

This is a loom knit baby sweater (12-18 months). The pattern is from Isela Phelps at Loom Knitting . I hope it fits the child it's intended for! It wasn't hard to make, just slightly time consuming. I like quick crafts because my attention span is kind of short. But, it is really cool that you can make sweaters on round knitting looms.

 
The sweater is too big for the elf, but maybe I could make her a smaller one.


Spa Kit!!!

The wash cloth and soap sack below are from  Anne Bipes' Learn New Stitches on Circle Looms . It's made using a seed stitch, which I LOVE! These are a little hard to see. Maybe I should have used a darker backdrop for the photos. I'm not sure how useful the washcloth and soap sack will be, but they're awfully cute!

Seed stitch is awesome!

The washcloth doubles as an elf blanket.

The soap sack could be an elf purse.

So that's all for right now. I have some other things that I'll photo later plus a few things I haven't finished yet. It's been a busy few months making gifts, but hopefully it will be worth it and people will like what I made for them.


Thursday, October 18, 2012

I Hate Keeping Secrets

When I'm really excited about something, I have a hard time keeping that something to myself. I want to tell someone. Anyone. When I make something that I think turns out well, I want to post it here. It was killing me not to be able to post these pillows until now! See, they were a gift, and I didn't want the person receiving the gift to see them before I gave them to her.

The pillows were a wedding gift for one of my husband's coworkers. She asked if he thought I could make something like this (just the pillows ... not the whole thing)...

via Etsy, Paula and Erika

I figured that I could... even though I had no idea how to do it ... so I told her YES! (Biting off more than I can chew is a major personality flaw for me. Fortunately, this didn't turn out to be one of those situations.)

So I started doing a little looking around to see how these pillows were made. It seemed that burlap was all the rage for these kinds of pillows (and lots of other things). After buying some scrap burlap to play around with, I quickly decided that my pillows weren't going to be made of burlap. Maybe other people are working with something different than what I could find locally ... I have no idea how you'd make these pillows (or anything, really) with burlap.

On to Plan B. I wanted something rustic, but burlap was definitely out. I chose a natural, unbleached canvas instead. It's sturdy, attractive, and easy to work with. Because I wanted the pillows to have a little color other than the canvas, I went on the hunt for a border fabric. This was actually harder than I thought it would be. The fabric needed to be rustic, go well with the canvas, and not be too feminine. Eventually, I found a nice brown fabric with a faint floral print. It fit all my needs. So I have my materials. Now what?

The next task was to figure out how to get the words on the canvas. Sew? Stencil? Free-hand paint? Turns out you can print on fabric. Who knew?  It's embarrassingly easy to do. A little spray adhesive to attach your fabric to card stock and you're ready to run it through the printer! But what font do I use?

When in doubt, turn to Google. Have you searched the internet for free fonts lately? The choices are OVERWHELMING! After browsing several font sites, I decided to limit my choices by searching for "rustic fonts." I found one called Bleeding Cowboys. It was pretty much perfect.

Okay. I have all my materials and I'm ready to sew. But what if the newlyweds decide to wash the pillows? Will the ink run? After a little testing, turns out the ink does fade fairly quickly in the washer (or at least it did for me). Eeek! What do I do now? Tell them to never ever get their pillows wet? (Is anyone else thinking of Gremlins right now?) No, I didn't want to give someone something that couldn't be washed, so I went in search of how to make the printed fabric more washer friendly. Turns out there's a fix for that, too. I bought a bottle of Bubble Jet Set 2000 (this doesn't even sound like a real product), applied it according to the directions and I was again ready to sew! (This product really did keep the ink from fading in the washer. I did a couple of side-by-side comparisons of printed fabric pretreated vs non pretreated, but didn't take photos ... oops.)

On to the sewing! The basic design for my pillow coverings comes from Rae Gun Ramblings . I obviously had to alter the design a little since the pillows were canvas on the back while the front was canvas and border fabric. If anyone cares how I did this, just ask and I'll explain. I used pillow inserts sized 16x16 and 12x16. I might could have used larger pillow inserts, but the size of my words were limited to the size of a standard piece of paper so I didn't want to go too big.

Anyway, after a slow start and several hurdles, I think the final product turned out well. As you can see, I ended up using a good deal of creating license with the pillows. They don't look much like the ones in the picture ... to me, they look better. The bride-to-be seemed to like them (WHEW! That was a BIG relief), and that's what was really important.


Oh... and I forgot to mention the small hurdle of trying to get the ink color to go with the border fabric color. That was a tough one that required a bunch of trial and error.

I've been making other things, too. Hopefully I'll get those posted tomorrow. Happy crafting!

Tuesday, October 9, 2012

Dryer Vent Pumpkin

This is a Pinterest idea that worked out stupendously! (I'm liking the word stupendous lately. I blame the frequent viewing of Tangled, where Flynn/Eugene says that having super powers in his hand would be stupendous.) This is just a dryer vent, hot glue, spray paint, some cinnamon sticks, raffia, Spanish moss, and leaves from silk flowers. I had most of these things in my craft supplies so I didn't have to buy much (just the paint & cinnamon sticks). Oh and a little foam to build up the center a bit (already had that, too).

I hot glued the dryer vent into the appropriate shape and spray painted it orange. When it dried, I added all the stuff in the center. That was it! I didn't permanently put the stuff in the middle (I didn't want to fight hot glue if I decided to rearrange things), but I'll probably go back and do that soon. I like it!


The inspiration for this pumpkin came from the blog A Diamond in the Stuff .

I'm really pleased with how this turned out!

Wednesday, September 26, 2012

I've Missed You!!!


It's been soooo long! I've missed you! Please forgive me for being gone so long.


I won't get long winded here and explain WHY I've been gone. You probably don't really care about that anyway. The important thing is that I have been making a few things during my absence and want to share those now.

So without further ado...


1.  Parliament of Owls

See this post for the owl inspiration
 

 2. Whale

The whale is a Pinterest idea. Here's the blog with the pattern.


3. Cute purse
This is an It's So Easy It's Simplicity pattern (A5151).

 
4. Scarf #1

Instructions from Learn To Knit on Circle Looms (Keep Warm Tubular Scarf).


5. Scarf #2


This scarf is the same as the one above but without the fringe.


Now if you'll turn your head to the left for a moment... 


6. Patchwork bag (front & back). (I hate it when I can't make the pictures go the right way... )


Bag inspired by a pattern available from allpeoplequilt.com


So that's it for now folks! I've got more scarves on the way and a few new stuffed animals in the works. Hope to get those finished and posted soon! (And will try for better photos next time... I got lazy with these.)


Wednesday, August 15, 2012

A Pinterest Inspired Shell Craft

The beach is one of my favorite places to go. I like the sand, the ocean, the sun, finding sharks teeth, and collecting seashells. As any beachcomber knows, those shells will definitely add up. A few decent trips to the beach and you're utterly overrun. What do you do with them? Do you display them or do you keep them in a box? I'm not a fan of traditional shell crafts (shells lining mirrors, bowls, shells made into candle holders, etc.), so what do do with all those shells is a big problem for me. 

I had started to think that maybe I shouldn't pick up any shells at all.That idea quickly went out the window ... I like finding pretty and interesting shells too much to not pick up any. Plus, my daughter (who is 3) likes to pick them up. She's not very discriminating when it comes to which shells she likes, so she ends up with a bunch.

Well, as is more and more frequent in my life, PINTEREST to the rescue! I saw  this pin and quickly added it to my Crafts board.

Seashell Shadowboxes

That pin took me to Under the table and dreaming's 60 Different Shell Crafts for your Collected Beach Treasures. The pin's original source is It's the little things that make a house a home .

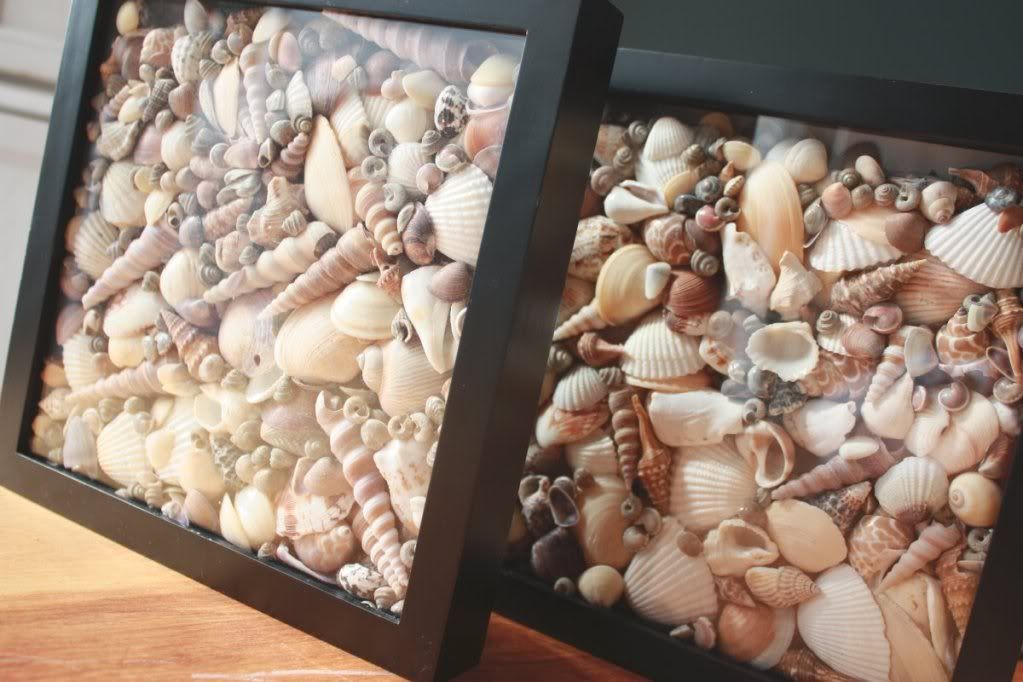
All you do is fill a shadowbox with your favorite shells. That's it*. These Simple Seashell Shadowboxes could not be easier to make. You can display a lot of shells without taking up much space. I used to display my favorite shells on shelves. Trust me, you do NOT want to dust a shelf with lots of seashells on it. (This paragraph is quite a tongue twister!)

I have many, many seashells, but I wanted to start out small. Here's how my shadowbox turned out. There may be a few more tweaks made to it, but I'm pretty happy with it overall.

Shells from Amelia Island

* I say that's all there is to it. Actually, I rubbed my shells with mineral oil first. It helps bring out the color in most of the shells. I rubbed a generous coat on all the shells, put them in a bowl and let them sit overnight (actually, it was more like a week or two because I'm slow to get back around to things). Then, I gave them another wiping before putting them in the shadowbox. Oh, and don't put mineral oil on things like sand dollars -- it doesn't turn out well (the voice of experience is talking here).

Craft Gremlins

I'll be honest ... When I make something that turns out right, 99% of the time it's by happy accident. I'm not especially skilled in any particular crafty area. Basic skills are present, but I truly believe that when something I make is really good, it's because the craft angels are smiling on me that day. The stitches just accidentally stay in a straight line ... The knitting pattern just happened to turn out with no missed stitches ... The flowers came together on their own in that vase ... etc. This belief is supported by the fact that I can very rarely repeat a success. Maybe that's why I have craft ADHD. Subconsciously, I know that I can create one good version of each thing I try so there's no reason to stick with any one type of craft for very long.

An alternative theory is that there are craft gremlins living in the walls of my house. On the days that I make something spectacular, those gremlins are enjoying a well-earned day off. Maybe they're  asleep or outside in the swimming pool or doing whatever it is that gremlins do when they aren't at work. I kind of like this theory because it explains (1) why I have so many more sort-of-okay crafts than spectacular crafts, and (2) how parts of my yard can look good one day and look like a disaster the next -- the gremlins had the day off and played outside. This theory also allows me to use the word gremlin. I like that word. It reminds me of my Grandfather. He drove a green Gremlin. I went back and forth to school in that car many, many days. (For those of you unfamiliar with the Gremlin, check out the Wikipedia entry.)

The Gremlin via Wikipedia
Wow! Talk about digressing! Back to the point of this post... not too long ago, I made two softies from socks that I thought turned out pretty darn good. I guess these guys were my high point in sock softie creation, because here's what I've made lately:

This is supposed to be a lamb (left) and a dog (right).

Perspective is weird on this one, but you couldn't see the face if I photographed her straight on.

This lamb is supposed to be asleep, but I just keep thinking about those horror movies where the monster has its eyes sewn shut. Also, the body is freakishly long.


So, while they're somewhat acceptable, they're also weird. Not sure if these will make it into the gift pile or if I'll just give them to my daughter. I think I'll stay away from sock-based softies for a while. Maybe I can convince the gremlins to move to someone else's house...or at least take an extended vacation.

The pattern for both the lamb and the dog came from a book Sock and Glove: Creating Charming Softy Friends from Cast-Off Socks and Gloves by  Miyako Kanamori.